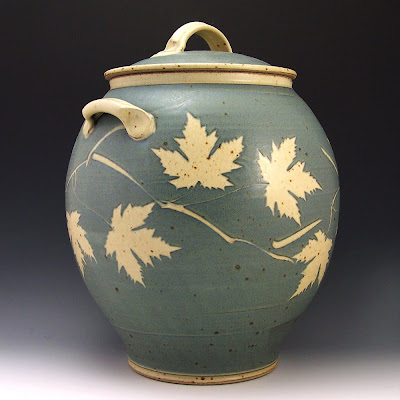
Carolanne asked me (in a previous post's "comments" section) how I go about creating my blue maple leaf pattern. Since few people visit the comments section of the blog, I thought I'd repeat myself here and create a post from her question.

It is a simple paper cut-out. When I first started using the idea, I tried real leaves. They worked, of course, but there were several things I didn't like about using them:
1. Believe it or not, I really didn't like the appearance of the veins leaving their marks in the soft clay. I put the leaves on while the pot is still wet -- while it's still on the wheel in many cases -- and real leaves' veins showed. The veins made the surface too busy and I was looking for a cleaner look because the thick slip was already adding lots of pattern and busy-ness to the surface. I liked it when the leaf broke up that busy-ness rather than adding to it.
2. Real leaves almost immediately curl up when coated with thick slip. A few times around the wheel and my brush was peeling back parts of the leaf and slip was getting underneath the curled edges. Paper leaves stay put. Paper leaves stick right to the wet clay and stay there.
3. I re-designed the leaf to a shape I liked better than nature's shape. It started out as a silver maple, but I "fattened" the spinyness out of that leaf -- made it much broader.
4. Real leaves were obviously seasonal, with no practical way to store them through the winter months.

The slip I use is about as thick as pudding. That makes for lots of spiraling brush marks (something I like). With the slip VERY thick, and the glaze only SEMI-transparent, what happens is a lot of interplay between the slip color and the glaze color.

I've said it before -- I don't favor glaze that looks like paint. If a glaze adds nothing but color to the surface, I'm usually not that interested in the glaze. This thick slip/matte glaze combination gives me a richer texture to the surface.
Because the slip is so thick, I often have to wait until the pot is a bit dryer. If I don't, the pots are likely to collapse with all the added moisture of the slip.
Also, because the slip is so thick I have to peel the leaves away (usually when the pot is a little softer than leather hard). If I don't peel them away, but instead try to fire the leaves off, what happens is the slip stays intact like a cicada shell. It has to be broken off the surface in order to be glazed. That doesn't work (where's that emoticon with the rolling eyes?).
Peeling the leaves away while the clay is still somewhat soft also allows me to see where to carve in the stems. It also allows me to actually distort the clay a bit with that carving.
If I ever get my video skilz up to snuff, I'd like to take a swing at illustrating how I do my slip-feathering-in-a-ground patterns...


Thanks John. Your work is beautiful!
ReplyDeleteThank you for sharing.
ReplyDeleteI hope you don't mind some silly questions....
ReplyDeleteHow long does it take you to cut out those very detailed leaf cut outs,and can you re-use them?
The matte semi transparent glaze looks like a solid Rhodes glaze when it's not on the blue slip.
You are a prolific and talented potter.Thank you for your post.
Hi Vicki! See you next week maybe? ...I'm coming down there for the "Tour DeClay". I'll be in Glenn and Keith's studio Saturday and Sunday. http://www.tampatourdeclay.com/
ReplyDeleteAnonymous,
Not silly questions at all. Sorry I almost missed 'em (I need to figure out how to get some sort of notification when I get comments to the blog!).
It takes a while to cut out the leaves, so I do quite a few at a time. The way I do it is to cut them out of a stack of paper 16 sheets thick. I use one of those box cutter/utility knives with the snap-off blades because I often need to change blades after every stack. I lay the stack of paper on a sheet of plate glass. Cutting the paper on the glass makes nice, sharp cuts all the way to the bottom of the stack.
No, I can't re-use them. And attempts at finding materials that I can re-use almost always yield the same result -- it's more work to clean the off for re-use than it is to simply cut more.
I used to do LOTS of the same idea with mylar stencils. In that case, the stencil was complex enough that the return on effort was worth having the reuseable stencil material.
The down side with mylar is that the pots can only be cylindrical because the mylar won't bend both ways to mask a sphere. Make sense?
The semi-transparent glaze is an old Ken Ferguson glaze I've had around here since the '70s.
Thanks for reading!